Pages

Sunday, August 14, 2011

This guy...


Raf cracks me up every single day. I was loving going through old photos, picking out the ones that made me smile the most...

He finds it so amusing when I get really involved in buying and putting away my "food toys" and felt it important enough to document (this is one in a series of five shots!).

***

I can't even handle how funny this attempt to take a nice shot of us is...I think my Mom just gave up!


One of our many adventures: Sausalito with our Greek buddies.


He patiently and sweetly (and not to mention fairly expertly!) takes shots of my jewelry for me...


Wearing my gigantic sunglasses with me!


Silly in Salt Lake...


Silly in Colorado...


Sigh...what a sweetie! :)


Saturday, Cooking Day: Homemade Ravioli and Pistachio/Poppy Seed Cookies..

Cooking is very meditative for me. I can totally zen out, even with the most complicated of recipes. I have been wanting to try making pasta for some time now, but was a tiny bit intimidated. I carved out time yesterday and got started making not only pasta, but a cookie that I have been wanting to try. I was worried it wouldn't be as relaxing as it normally is because there was a lot going on in the kitchen between those two projects, but it ended up being great!

The pasta turned out really quite good, although I have a few things that I would change.
  1. Next time, I would use half white whole wheat flour/half unbleached all purpose four. I use whole wheat or white whole wheat pretty much exclusively around here, but pasta would be the exception. It is just so thick and hearty and I would have liked it to be a bit lighter.
  2. That said, I would roll the dough out even thinner than I did (and I rolled it out pretty thin). I guess it would be lovely to have a pasta roller (maybe someday) because it takes a lot of muscle to roll it. I would have liked it to be a bit more delicate!
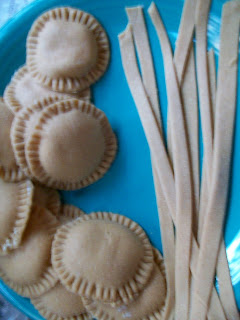
  3. Don't let the ravioli touch each other before they dry! They stick and tear and the filling squeezes out. Lay them, separated, on a flat surface to dry.

So, I will give you the basic recipe I used for the dough. It uses eggs, but it wasn't too "eggy" as I was worried about. If you have a pasta roller--go for it! But if not, just roll up your sleeves and get to work! I made a vegan filling with cashews and tofu (that is what I had around) but ricotta would be great too. I topped them with swiss chard, portabello mushroom, carmelized onions, Meyer lemon zest, and chopped, toasted hazelnuts, sprinkled with smoked gouda cheese. You could use any topping you want (red sauce, other veggies, pesto, etc.) and it can be eaten hot or cold. And they freeze ridiculously well, so make the whole batch, lay them on a cookie sheet in the freezer for an hour, then pop them into a freezer bag (pre-cooked).

Pasta dough (adapted from a variety of online sources):
(makes 4 sheets rolled out)
  • 3 c. flour (I recommend 2 unbleached white and 1 white whole wheat) plus more for rolling
  • 1 tsp. salt
  • 3 eggs or egg replacement equivalent of 3 eggs
  • 1 Tbsp. olive oil
  • any dried herbs you want to add such as basil, oregano, thyme, sage, etc.
  • approx. 3/4 c. of water (add about a 1/4 of a c. at a time until you have a smooth, not too sticky, not too dry dough and adjust if needed)
Mix flour and salt in an electric mixer (by hand is okay too, but it will take more work!). Beat eggs and oil. Add to flour mixture. Add water until it comes together. Knead for 8-10 minutes until it becomes an elastic and shiny ball of dough. Wrap in a damp towel for 30 minutes while you prepare the filling.

Cashew and tofu ricotta (adapted from Veganomicon cookbook):
(makes 2 cups)
  • 1/2 c. raw cashew pieces
  • 1/4 lemon juice (fresh squeezed if possible)
  • 2 Tbsp. olive oil
  • 1 lb. of firm tofu, drained
  • 1 1/2 tsp. salt
  • any dried herbs such as oregano, basil, thyme, sage to taste
  • 1/4 c. of nutritional yeast or parmesan cheese (reduce salt by 1/2 tsp. if parmesan)
Blend cashews, lemon juice and olive oil in a food processor until cashews are broken up into fine pieces. Add tofu, salt, herbs, and parmesan or nutritional yeast. Process until well blended. Set aside while you roll out the dough.


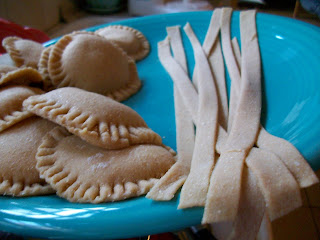
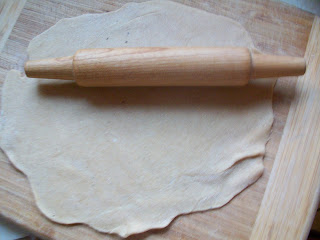
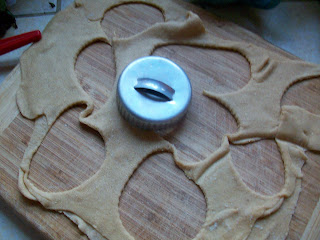
To roll out the dough you need a rolling pin, a clean, smooth surface, and some extra flour. Dust the surface with flour, along with your rolling pin. Take a quarter of the prepared dough and create a ball. Flatten it out as much as possible with your hands. Begin rolling back and forth, flipping it over every once in a while and adding flour when it begins to stick. Roll until you have a very thin sheet (approx. 1/8 " thick all the way around). Carefully pick it up and do the same for the remainder of the dough. You can work with smaller pieces if you want to. When finished rolling, take a piece of the thin dough and put tablespoon-sized dollops of the filling all over the sheet, leaving a 1/2" border and about the same in between each one. Do this until you fill the sheet. Wet your finger and trace a circle around the lump of filling to help make a seal. Add another sheet of dough on top and press around the filling lumps to seal the top and bottom dough together. Use either a round cookie or biscuit cutter, a water glass, a pizza cutter or a metal scraper to cut the ravioli into shapes. I used a biscuit cutter, floured every time. You will repeat this until the dough and filling are used up. Take a fork and carefully press around the outside edge of the ravioli to seal completely. Set the ravioli aside on a flat surface (not touching each other!) to dry for 30 minutes-ish. If you have leftover dough, but no more filling, you can use a pizza cutter or scraper or knife to make pasta noodles. They need to dry the same way.

After you are finished and they are dried a bit, you can freeze it at this point or cook them. The ravioli cook in boiling water for about 9 minutes. The pasta about the same!
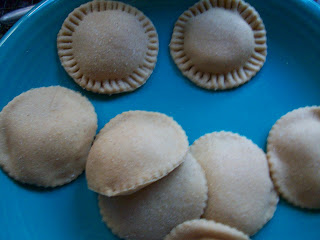


Aren't they cute?!


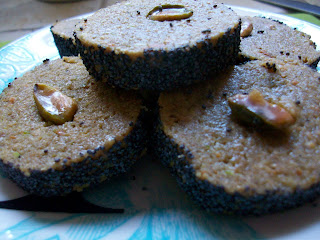
Pistachio cookies with poppy seeds! This recipe is for my friend Beth! Yay! Hi Beth! So, I found a recipe for a savory cracker in the cookbook, Savory Baking, that looked really beautiful and interesting. They look just like little sushi rolls...well, sort of. I thought that it would be even better as a sweet cookie. Well, I guess I wanted it to be a not super sweet cookie. You see, we eat a lot of chocolate around here, and sometimes I want something NOT chocolate, and not too sweet. Anyway, I changed some of the ingredients up and added a few more. The texture turned out really good. I think that if I made them again I would add cardamom and rose water and subtract the poppy seeds. Although for this particular recipe, the poppy seeds are really good...anyway.


Pistachio Cookies with Poppy Seeds (adapted from Savory Baking):


  • 1/2 c. shelled pistachios, plus a handful extra for garnish
  • 1/4 c. butter
  • 4 Tbsp. granulated sugar
  • 1 egg or egg replacement equivalent
  • 3/4 c. white whole wheat flour
  • 2 Tbsp. milk (I used soy)
  • 1 tsp. vanilla
  • 1/2 c. black poppy seeds
  • extra granulated sugar for garnish or powdered sugar and water for a glaze
(Raf digging in :)

Preheat the oven to 375 degrees. Put the butter, pistachios and sugar in a food processor. Blend until the nuts are very well chopped, approx. 2 minutes, scraping down the sides a few times. Add the egg, vanilla, and soy milk and process until smooth. Add the flour and pulse a few times until the mixture comes together. Gather the dough with your hands and split in half. Create two, smooth logs out of each half by rolling them on a plate and then tapping each end on the plate to make the ends flat.


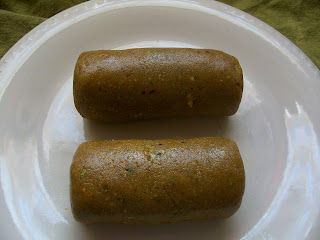
Spread poppy seeds out on another plate. Gently roll the logs, one at a time into the poppy seeds until they are well coated.


Place the coated pistachio logs in the refrigerator for at least an hour.


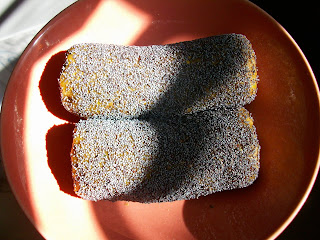
Take the logs out. They should be very firm. With a serrated knife, cut them into rounds, about 1/2" thick. Place them on an ungreased cookie sheet. Gently press a pistachio half into each cookie. If using powdered sugar, prepare a glaze (2 Tbsp. powdered sugar to a few drops of water). If using granulated sugar, press it into the tops of the cookies before baking. Place them in the heated oven for 10-12 minutes. When cookies come out, gently glaze them while they are still hot. Let cool. Eat!


Saturday, August 6, 2011

Weekend Breakfast: Hazelnut Waffles!


On the weekends, Raf and I typically pick one day to make a really good breakfast. We usually go for a frittata of sorts, but the past two weekends we have been making hazelnut waffles. It is pretty cute because we have a little hazelnut assembly line: I toast them, he peels them and puts them in the grinder, and then I grind them and add them to the batter!


These waffles are pretty darn good...I have tried a few recipes with my waffle maker and I have had some major fails. The batter can be too thin, not have enough fat, and the worst is when it sticks to the waffle iron. Speaking of, I am so glad I purchased a waffle iron a few years back--I don't use it very often, but when I do, it makes me so happy! It always feels super fancy and special to make your own waffles. The recipe I used is below. It has come out perfect both times... I adapted it a tiny bit, but it came from a cookbook called Savory Baking, which I HIGHLY recommend. I served them with Gimme Lean veggie sausage, blueberries, bananas, maple syrup and an almond milk latte! Yum!


Hazelnut Waffles (makes 6)

*** If you don't have a waffle iron, I think this batter would work nicely for pancakes too!

* 1/3 c. hazelnuts (toasted, skinned and coarsely ground--but you could use any nuts you have)
* 1 1/4 c. flour (I used white whole wheat, but I think a combo of 1/2 unbleached white and any other whole grain variety would be good)
* 1 tbs. organic sugar (or any sweetener)
* 1.5 tsp. baking powder
* 1/4 tsp. salt
* 2 eggs or equivalent egg replacement
* 1 c. milk (I used almond)
* 1/4 fat (I used canola oil, but you could use melted butter, etc.)
* 1/2 tsp. vanilla

Set waffle iron on medium-high. Preheat your oven or toaster oven on a low setting to keep finished waffles warm while they other cook. Mix all of the dry ingredients, including nuts. Whisk the eggs, milk, and oil or butter in a separate bowl. Combine the two. Blend until all of the flour is incorporated--makes a fairly thick batter. Brush oil or butter onto the iron using a pastry brush. Put about a 1/3 c. of batter into the iron at a time. The waffles should steam a lot while cooking, when they stop steaming, they should be about done, but you can usually tell by looking at them! Enjoy!

Best purchases ever (except that I got the pitcher out of a free pile!) along with my AeroLatte milk frother...

Almond milk, cinnamon, and Berkeley Blend latte--yay!

Tuesday, August 2, 2011

White Peach Jam with Vanilla and Lavender

Sigh...I think that this may be the height of my jam making career! :) No, really, I am amazed at how this batch turned out. The flavors are so subtle and complement each other so nicely. I'm pretty sure this one won't happen again, well, at least not exactly. And the bummer is that it only made four and a half jars. Darn. As an undergrad, my painting professor/mentor always told us to not make each piece of art "precious", that more good art will happen if you keep working at it. It is kind of like that with cooking too. Sometimes I really fuss over the food I make and then it turns out fussy. Some of the best surprises happen when I just let go, experiment, and have fun.


It all started with the most perfectly sweet white peaches. Four cups mashed, to be exact. They are at the peak of their season here, and I am hooked. They are free stone too, which made it super easy to prepare. I blanched them, peeled them, pitted them, sliced them in half, and then used a potato masher to mush them down--creating small chunks and juice. They turned into the most beautiful color, a really soft, muted peach, unlike the golden peach you normally see. They were quite sweet on their own, but I wanted to make the jam a bit more exotic, so I brainstormed some flavor combos. We have a lavender patch on the side of our building, so I went and picked a small bunch. I also wanted to warm the flavor up a bit, so I grabbed the pure vanilla extract from the cupboard. To use the lavender, I popped the flower buds of about 4-5 stems and put them in a small pan with a half cup of water. I let it come to a boil, then set it aside to cool. After it cooled I strained it, separating and reserving both the buds and the liquid (in the end I decided to add both). I added about a teaspoon or so of vanilla. And I sweetened with about 3/4 of a cup of agave. The combination of those ingredients was a perfect balance...n'uff said. Oh wait, I forgot to mention that, as usual, I used Pomona's Universal Pectin (which allows you to use either a small amount of sugar, or alternative sweeteners) and the measurements for peach jam inside the box!


My sweet, vintage-kitchen-gadget-collecting-Mom donated these amazing and oh-so-helpful tools to me! Hooray! I definitely burned myself less and had less of a mess to clean up with my new "jar grabbers" and canning funnel!

So pretty.Align Center

Monday, August 1, 2011

Nectarines, white peaches, and plums--oh my!


So, there was an article in the most recent Edible East Bay about an area called Brentwood. It's about an hour from Berkeley and is loaded with farms, U-pick farms in particular. One thing I loved about summertime in Ithaca is going berry picking with my pals (especially Haley--I miss you Hale-bop!) There is a group called Harvest Time in Brentwood that has a website linking people up with member farms. The site is great, and it gives you a printable map of the area where the farms are located and what is in in season at each farm, each month. Ever since reading that article, I wanted to do a "U-pick crawl", hopping from farm to farm and eating/buying produce to take home and preserve. I got in touch with my pals Maggie and Jamie and set up a date!

When we arrived, I was blatantly aware of the vast difference an hour drive can make on weather outside of the "fog belt" where we live in the Bay Area. It was sunny in Berkeley, and a solid 63 degrees--really beautiful and pleasant. Once we arrived in Brentwood (silly me wearing jeans, sneaks, a t-shirt and sweater!), it was a different story--it was HOT! It felt like it was in the mid-90's and very dry. Thankfully I brought a pair of flip flops (which were great anyway because they were easy to clean all of the sticky fruit off of at the end of the day) and was able to roll up my jeans a bit to get down to work! The first few places were pretty busy, and certainly not very relaxing. They had families everywhere, they were mostly near the road, and offered very little escape from the heat. Not really what I expected for a day at a farm. I was hoping for a sultry stroll through orchards, a nice summer breeze now and again while taste-testing which ripe fruit I would pick to take home. As is turns out, the main things available were stone fruits (we just missed cherry season!), so I decided to load up on organic nectarines and white peaches at the first 2 stops, as they really were amazingly delicious. By the second or third stop, we were already getting pretty worn out, but still hadn't come across any plums, pluots, or figs. I was on a mission to get really good plums, so I was a bit bummed. We hopped in the car, headed in the direction of the highway home, and saw a sign--Canciamilla Ranch-- that seemed promising. This one looked off the beaten path-- a long, private road lined with trees and a few homes and outbuildings. After cruising down the lane for a bit, I started to get the relaxed feeling I was hoping this trip would bring. Once we pulled up to the ranch, we knew we had scored the perfect place to end our crawl. We parked in the shade and strolled over to the main entrance/farm stand. There was a sweet girl there who told us what was available. It was super laid back, there may have been one or two other small groups there and the prices were amazing. All of the organic stone fruit was only $1.00 per pound. We hung around with the ranch's animals for a bit--chickens, geese, and a bunny before grabbing a bucket and heading down into the fruit orchards. The view was incredible--a hazy mountain to the left and rows and rows of trees full of nectarines and two varieties of plums. The sun was hanging perfectly in the sky, giving off the most generous light for snapshots, and there was a gentle breeze that picked up just when you needed it to. It was definitely a magical and perfect end to the trip. After we paid (I also got beautiful pale blue, green and brown eggs and tomatoes), we chatted up one of the owners for a bit and then headed out. I would highly recommend this place to anyone wanting a really nice u-pick experience! Next post will hopefully be about the preserving I did with the bounty!


Santa Rosa plums!


The Beavis and Butthead sign makes me roll...


Such personalities!

A growing pomegranate!